
Half Baked at 20 Weeks: The Easiest Pregnancy Photo Shoot Ever (With Chocolate Chip Cookie Recipe)
- kelsey
- Jan 28
- 3 min read
Updated: Jan 29

If you’ve spent even five minutes on Instagram, TikTok, or Pinterest lately, you’ve probably seen the adorable “half baked” pregnancy photo shoots taking over your feed. Flour-dusted bellies, cookie dough, sweet ultrasound photos, and the perfect little phrase written across the counter. It’s such a fun way to celebrate being halfway through pregnancy at 20 weeks… and of course, I immediately wanted in.
But let’s be honest. Between first trimester exhaustion lingering into the second, managing blood sugars, and just not feeling like getting fully camera-ready, I wasn’t exactly up for an elaborate shoot or a full baking day. I wanted something cute, meaningful, and simple. No face in the photos, minimal effort, and maximum payoff.
So I created the easiest version of the viral “half baked” shoot using a super simple chocolate chip cookie recipe and a very low-stress setup. Here’s exactly how I did it so you can recreate it at home.
The Cookie Recipe
This classic, no-fail chocolate chip cookie recipe is perfect for both the photos and the reward afterward.
Ingredients
1 cup (2 sticks) unsalted butter, softened
¾ cup light brown sugar, packed
¾ cup granulated sugar
1 tablespoon vanilla extract
1 large egg
2 ½ cups all-purpose flour
¾ teaspoon baking soda
¾ teaspoon salt
1 ½ cups semi-sweet chocolate chips (plus extra for topping)
Instructions
Preheat your oven to 350°F (175°C) and line two baking sheets with parchment paper.
In a large bowl, cream together the butter, brown sugar, and white sugar until light and fluffy.
Beat in the egg and vanilla, scraping down the sides as needed.
In a separate bowl, whisk together the flour, baking soda, and salt. Slowly mix into the wet ingredients until just combined.
Fold in the chocolate chips.
Scoop dough onto the baking sheets and bake for 10–12 minutes, until the edges are set and the centers are soft.


Now onto the fun part!!
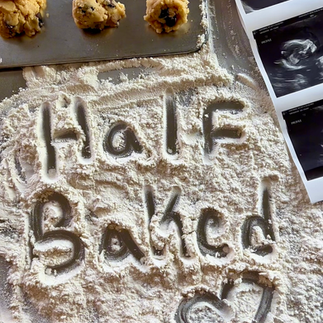
What You’ll Need for the Photo Shoot
Extra flour
A cookie sheet with raw cookie dough
Your ultrasound photos
A stool (I had to kneel on one to get the right belly angle)
A hands-free phone holder (I used one that wraps around your neck and linked it in my Amazon storefront)
A very helpful husband for cleanup
A quick note about the ultrasound photos: If you received high-quality prints from your OB or Maternal Fetal Medicine office like I did, they come with a glossy protective finish. The flour doesn’t really stick and brushes right off, so don’t stress about them getting ruined.
How to Set It Up
Start by sprinkling flour directly onto your counter. Don’t overthink it. I tried way too hard at first to make it perfectly smooth and even, and it just ended up looking thin and patchy. The best look comes from simply sprinkling it by hand or using a sieve and letting it fall naturally.
Once the flour is down, place your cookie sheet with raw dough nearby and arrange your ultrasound photos in the frame. Put your phone in the holder, open your camera, and check the angle so your belly is fully in view.
When everything is positioned, hit record.
Using your finger, write “half baked” into the flour. Take your time, enjoy the moment, and let it be imperfect. That’s kind of the whole point.


One Last Tip
This gets messy. Like, flour-everywhere messy. Make sure your husband is on standby for cleanup… and reward him with freshly baked cookies afterward. Mine was more than happy to help once he realized dessert was involved.
This little shoot ended up being such a sweet, simple way to mark the halfway point of pregnancy without pressure, without posing, and without needing to feel camera-ready. Just a growing belly, a few meaningful details, and a reminder that even when you’re tired, you’re still creating something beautiful.